Chicken With Brown Rice & Leeks

Fast simple hearty soup that eats like a complete meal. 

Ingredients: 
2 Tbs Olive Oil

1/2 Cup White Wine
2 Quarts of Chicken Stock
3 Large Leeks
1 Cup Uncooked Brown Rice
2 Large Chicken Breasts

Preparation:
Leeks tend to pick-up bits of grit and sand as they sprout from the soil and need to be cleaned thoroughly. Start by trimming away the inedible tops and the root bottom. Splint the leeks length wise and then slice the halves about 1/4 inch wide. Place the cut leeks in a colander an rinse thoroughly with cold water and drain.


In your favorite straight sided sautee pan add and heat the pan on high heat. When the pan is hot add your leeks.Stirring occasionally let the leeks cook until they start to get a little brown on some of the edges and are tender all the way through, about 5-7 minutes depending on the quantity. Without lowering the heat add the wine. Stir occasionally and cook until about half the wine is reduced away.

Prepare the chicken breasts by trimming away any fat and connective tissue and then cutting them in half horizontally so that you have 2 pieces form each breast about 1/2 - 3/4" thick. 

In a heavy skillet on high heat add enough oil, (canola is my preference)  to just coat the bottom of the pan. When the pan and oil are hot start adding your chicken breasts. Cook each side about 3 minutes until chicken is cooked through and there is a nice golden brown crust on each side. Repeat until all the chicken is cooked. 

Let the chicken rest at least 5 minutes and then slice lengthwise into about 1/3 inch strips and then cut those in half or thirds. Allowing the breasts to rest before slicing them up will stop the juices from running out on your cutting board and will help retain flavor.

In a five quart pot add the leeks and the remaining liquid they were cooked in along with the chicken stock, chicken and the uncooked rice. Bring to a boil then cover and reduce heat to medium and cook for 15-20 minutes until rice is tender.

If you feel the soup is too thick and would like more liquid add a cup of water or more stock to thin.

Roasted Butternut Squash Bisque

There's a chill in the air and the leaves have begun the journey from the branches to the ground as the days grow shorter. A sense of melancholy begins to wash over the sun worshipers of summer as we prepare for the cold dark winter. The arrival of the season's first frost brings two things to mind and they're not doom and gloom, they're Soup and Squash!

Back in 1966 a Scottish singer\songwriter named Donavon called it the Season of the Witch and like Donavon when I look out my window there are many sights to see. Big bright orange pumpkins, wavy dark green acorn, pale yellow spaghetti and the beige stretched bell of the Butternut. Squashes all!

Few things in the produce aisle evoke more confusion, fear and outright avoidance then the winter squashes. The squashes of summer are fun, familiar and friendly. Zucchini's baked in breads and quiches. Sauteed, grilled, roasted, battered and fried we love them.
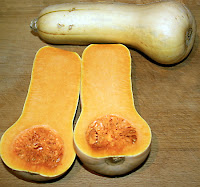
Butternut Squash
Butternut Squash
Winter squash on the other hand is unfamiliar ground with the exception of the pumpkin which is either the subject of ritual mutilation or baked into pies. Almost without exception starting in early fall I hear the same question on my forays to the supermarket, "Excuse me, but what are those and what do you do with them?" To which I reply with a decided sense of squash swagger "They're butternut squash and I eat them!"

You might think that pointing out that I eat a given produce would end with the recipient of my snooty response turning on his or her respective heal and mumbling to themselves about what a jerk I am but you would be wrong. A look of surprise crosses their faces as they each utter the same one word, REALLY! Not the back at you wiseguy kind of really, but a genuinely surprised really.

The butternut squash is similar to the pumpkin in texture and flavor which is slightly sweet and mildly nutty and can and often is substituted for pumpkin in pie making mostly because they are easier to handle, size wise. Like pumpkins you don't eat the skin but you can roast and eat the seeds if you like.

Bisque is a rich, creamy well seasoned style of soup that has its' roots in french cuisine and sounds more imposing then it is to make. So rest assured there is no reason to run screaming from the room if both butternut squash and bisque are Greek or in this case French to you.

Ingredients:
2 Average Size Butternut Squash
2 Quarts of Chicken Stock
2 Sprigs of Fresh Thyme
2 Sprigs of Fresh Rosemary
1 Bay Leaf
1 Tsp Salt
1/2 Tsp Cayenne Pepper

Optional Ingredients:
Heavy Cream or Roux

Preparation:
Begin by cutting the stem and bottom off your squash and then peel them with an regular vegetable peeler as the skin is not very thick or tough. Once the are peeled cut them in two lengthwise and remove the seeds. Remember the seeds can be roasted and eaten just like pumpkin seeds. Cut the halves into 3/4" pieces and place them on a cookie sheet to bake in a 375 degree oven until then are fork tender.

Some of you are thinking, do I have to roast them in the oven? The answer is if you want Roasted Butternut Squash Bisque you do! However if you just want ordinary Butternut squash bisque you can follow the instructions above and just boil them until tender. BUT and that's a BIG BUT, you will not have that smokey quality that comes with roasting.

While the squash is roasting add the 2 quarts of chicken stock to a five quart pot and on medium\high heat add the bay leaf, salt, rosemary and thyme. I like to use a piece of kitchen string to tie by rosemary and thyme together in what is called a Bouquet Garni which is a sophisticated bundle of herbs with a french accent and sounds very impressive. Mostly it makes it easy to remove later.

Place the tender squash in a blender or food processor along with some chicken stock. The amount of stock depends on what your blender or food processor is going to need to allow you to puree the squash. Before adding the puree to the pot with the remaining stock remove the bouquet garni and the bay leaf as they have done their work and are no longer needed.

Cook on low heat for 15-20 to allow the bisque to thicken. Stir in the cayenne pepper 1/8 tsp at a time and sample the bisque and continue to add remaining until it is either all in or spicy enough for your taste.

Optionally at this point you can add either the heavy cream or roux to the bisque to thicken. Continue to on heat for an additional five minutes and serve, refrigerate or freeze.
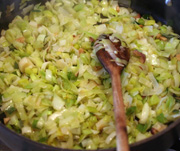

Rip Off Artist

Who doesn't like Pizza? It is the quintessential American food.... that originated in Naples Italy and is available in varying degrees of quality in every city, town and country hamlet in America. It comes in Kosher, Halal, vegetarian and vegan, fresh, frozen, dehydrated and kits. You can get it delivered by a pimply faced teenager from a chain store, a Chinese immigrant on a bicycle who works for a Croatian who lived in Italy before emigrating to the US. Or, you could make it yourself from scratch.

Since this is a blog about cooking and eating we're gonna talk about the homemade kind. Let's start with a little dose of honesty. Making Pizza at home is EASY! I confess that for a long time I allowed my culinarily challenged wife to believe that it was a big deal and deserving of her deep admiration for my Herculean effort. Eventually, guilt got the best of me and I confessed and shortly all of you will also know that making pizza at home from scratch is remarkably simple.

How simple is it, you ask? So simple that after you read this you will be able to make a perfectly delicious pizza yourself, at home and reap whatever ill-gotten benefit you receive from loved ones and friends who believe the process to be mind-bogglingly difficult.

However before we get to the cooking part you have to endure one of my food stories. Of course since this is all in writing if you want cheat and skip ahead to the recipes I'll never know and you can pretend you enjoyed this part so I don't feel bad.

Contrary to what I claim publicly my wife does take me out to eat on occasion. The problem we have with dining out is that, well as arrogant as it sounds, I'm just too good a cook to pay to eat anything that is less then exceptional. So when we eat out we stick to places that serve great food. Notice I did not say "good" restaurants because good usually means pricey and price does not always equate to quality.

One of the places we enjoy eating is in Downtown Easton, PA. For those living elsewhere, there are a couple of things you should know. Pennsylvania has cities\urban centers other then Philly, Pittsburgh and thanks to The Office, Joe Biden and Hillary Clinton, Scranton. Easton is a small city just across the river from New Jersey and home to Crayola that has in the last few years developed a number of really quality restaurants.

One of these restaurants is an Italian Place named Sette Luna on Ferry St. which makes among other things some wonderful pizza's. One such Pizza is a Greek Pizza which I have gleefully ripped off, rather chosen to honor by recreating my own humble version of at home. Small restaurants in smallish cities are not my only source of thievery, sorry inspiration, I borrow pizza ideas from the big guys too. I do a version of a pie we tried at Eataly which is Mario Batali and Joe Bastianch's store\restaurant(s) experience.

For me eating out at home is one of the perks of living in a restaurant. I don't actually live in a restaurant but I eat like I do. My point is eating out is seldom about satisfying my physical hunger so much as satiating my desire for something different. A chance to be inspired. I don't eat out to have a night off from cooking but to find a new way to make something old or an old way to make something new.

Pizza is the perfect meal because it is so versatile. The same basic process can deliver a comfortably familiar plain cheese pizza or a decadent gourmet dinner suitable for impressing someone special yourself included. I still love a plain slice from most pizzerias in New York but at home I like to go to Chicago for a ripped off version of Lou Malnati's deep dish sausage pizza.

The bottom line is when you eat out get your money's worth and rip the joint off for a recipe or two.

Basic Pizza Dough
Cheese Pizza
Greek Pizza
5 Cheese White Pizza
Pizza With Prosciutto
Deep Dish Sausage Pizza - Coming Very Soon!

Prosciutto Pizza

I confess I am not at all ashamed of my thieving ways. While pretending to visit our son at NYU Lorraine and I ate at Mario Batali's Eataly and while Lorraine had what is the BEST, slightly better then mine, Braised Short Rib Ragu I have ever had, I thoroughly enjoyed a Bufalo Prosciutto Pizza so much so that I ripped it off along with the Ragu. 

Sorry Mario!

Ingredients 
1 Ball of Pizza Dough
1 Lb Fresh Mozzarella
8 Oz Fresh Tomato Sauce (a can if you must)
1/4 Cup Grated Parmesan Cheese
1/4 Lb Prosciutto di Parma
1 Tbs Dried Oregano
1 Tbs Dried Basil
1 Tbs Dried Thyme
1Tbs Granulated Garlic or Garlic Powder
1 Tbs Onion Powder
1 Tsp Black Pepper 

1 Tbs Extra Virgin Olive Oil

Preparation
A couple of notes before we begin. For those of you who don't know me, I'm cheap. So when I specify a particular ingredient such as Prosciutto di Parma over a less expensive domestic prosciutto it is not because I have money to burn but because the taste is worth it, if you can afford the few extra dollars. 

I also specify Fresh Tomato Sauce if possible because again this just adds a dimension to the pizza that is worth the trouble but is not necessary. By Fresh Tomato Sauce I mean from whole tomatoes. You can use canned whole tomatoes like San Marzano or domestic or you can throw 6-8 ripe romas in a pot of boiling water and when the skin puckers run them under cold water and peel them.

In either case, canned or fresh puree just the tomatoes in a blender or food processor. Be sure not to include the extra water that is in the can of whole peeled tomatoes. That's it. That's all you want to do. You don't want to put them in a pot on the stove with herbs and cheese and cook them you just want them pureed.


Let's build a Pizza.


Stretch your dough, round, rectangular, or other, to 1/4" or thinner and spread olive oil evenly on top. Spread a thin coat of tomato sauce covering the dough to about 3/4 of an inch from the edge. Evenly add the herbs, Oregano, Basil, Thyme and seasonings, Garlic and Onion Powder, and Pepper. 

Salt is left out intentionally because Prosciutto is a salt cured ham and therefore there is no need to add more.

Cheese is next. Before the Mozzarella sprinkle your Parmesan over the sauce and herbs. Fresh Mozzarella is the way to go here, sliced is best. For those not sure what the difference is between plastic wrapped Mozzarella and Fresh, Fresh is the soft one that you can now find in most better supermarkets and in Italian specialty stores. 100% Coverage is not what you are looking for in this case 80-90% coverage is more then adequate for this pizza.

Finally cover as much of your pizza as possible with the Prosciutto in one layer.

Cook it at 450 degrees on either a pizza stone or top rack until the crust is lightly brown and the bottom is dark golden to light brown. Total cooking time will vary since you can't trust the temperature of ANY oven between 7 and about 12 minutes.

Every time you take a bite and think how good it is remember you are an accessory to Pizza Recipe Theft.

Five Cheese White Pizza

In Italian it's called Pizza Bianco - White Pizza. My white is a bit more then Mozzarella and Ricotta and with all due honesty and humility is the best damn White Pizza in North America. Before you send me a nasty email telling me that my claim is not humble take note that I said the Best in North America, not the World!

Ingredients
1 Ball of Pizza Dough
1 Cup Shredded Part-Skim Mozzarella
1 Cup Part-Skim Ricotta
1/3 Lb. Fresh Goat Cheese
1/4 Cup Grated Asiago Cheese
1/4 Grated Parmesan Cheese
1 Head of Garlic Finely Chopped
1/2 Cup Oil Packed Sun Dried Tomatoes Chopped
6 Ripe Roma or Plum Tomatoes
2 Tbs Dried Basil
2 Tbs Dried Oregano
2 Tbs Dried Thyme
1 Tbs Extra Virgin Olive Oil
1/2 Tsp Salt
1/2 Tsp Black Pepper

Preparation
I want to be clear I said an entire head of Garlic not a clove finely minced. If you are really shy use 3/4 of a head of garlic but not less.

If you made your dough from scratch you can do this while it rises or if you purchased dough at the supermarket leave it in the refrigerator until you need it but first ask yourself why am I using supermarket dough in the first place when making my own is so easy?

After washing your tomatoes cut off the about 1/4 inch from the stem end and then cut them in half length wise. Using your finger gently scoop out as many of the seeds along with the jelly surrounding them as possible, perfection is not required and place them face down on a cookie sheet that has been lined with aluminum foil and sprayed with cooking spray. Then put them in a 450 degree oven for about 30 minutes.

As always you can't trust ANY oven to be 100% accurate so check your tomatoes for after 20 minutes and every 5 minutes thereafter. You are looking for them to collapse almost completely and start to get brown in spots and there should be some black around them where they meet the foil. The black is not burned but the sugar in the tomato caramelizing.

When the tomatoes are done we can begin building our pizza.

Stretch your dough, round, rectangular, or other, to 1/4" or thinner and spread olive oil evenly on top leaving 3/4 of an inch for crust. Evenly distribute the dried herbs on the oiled dough. When all the herbs are on the pie should be pretty well covered and looking disturbingly dark.

That head of garlic is next in line to be added. You'll want to add enough to cover the entire pie ensuring that you get a mouthful of minced garlic in every bite no matter how small that bite is. Now is the time to go back and chop up the rest of the garlic because you didn't believe me in the first place. Go on, I'll turn my back.


Starting with the two dry grated cheeses, Asiago and Parmesan spread them evenly around. A note on the these two cheeses, Asiago is tangy and I prefer you don't substitute something else but the Parmesan can be replaced with, Locatelli, Reggiano or Grana if you like them better. Just be sure to evenly distribute them so that every bite gets a taste. 


Mozzarella goes next followed by crumbling the goat cheese around the whole pizza. Next add the chopped Sun Dried Tomatoes. I strongly suggest oil packed but if all you have access to is dry soak them in olive oil for an hour to soften them before use. Make sure you drain the oil by squeezing the tomatoes in your hand before spreading them around.


With a spoon add the Ricotta in lumps about 2 lumps for every slice. Finally add the oven roasted tomatoes to pizza and prepare to bake.Cook it at 450 degrees on either a pizza stone or top rack until the crust is lightly brown and the bottom is dark golden to light brown. Total cooking time will vary since you can't trust the temperature of ANY oven between 7 and about 12 minutes.

After you're done enjoying this be sure to send a note or maybe some flowers to your favorite pizza shop and let them know you won't be back for white pizza anymore.

Cheese Pizza - From Scratch

Everybody loves pizza. Not everyone makes their own pizza. I grew up in a household where Saturday night was pizza night. I knew, my family knew it, my friends knew it, everyone knew Saturday night was Al's Pizza. If you didn't live in my house you tried to find a way to be there on Saturday night if at all possible. So it is still difficult for me to accept that not everyone knows how to make homemade pizza.

Making pizza from scratch is so easy it borders on embarrassing once you get the hang of it and getting the hang of it is even easier then making pizza from scratch. Don't dwell on that last sentence it will only make you crazy...for PIZZA!

Whether you start with store bought dough or go all in and make your own it takes less time to prepare a fresh scratch cheese pizza, including cooking it then it takes to order one and pick it up or wait for delivery. It takes 5 minutes longer to make a fresh, 100% natural, wholesome, healthy, tasty pizza from scratch then it does to heat a frozen pizza from a box. I PROMISE!

Ingredients 
1 Ball of Pizza Dough
1 1/2 - 2 Cups Part Skim Mozzarella
1 8 Oz Can Tomato Sauce (Not Pizza Sauce)
1/4 Cup Grated Parmesan Cheese
1 Tbs Dried Oregano
1 Tbs Dried Basil
1 Tbs Dried Thyme
1Tbs Granulated Garlic or Garlic Powder
1 Tbs Onion Powder
1 Tsp Black Pepper 
1 Tsp Salt
1 Tbs Extra Virgin Olive Oil

Preparation
Before we start notice in the ingredients I specified NOT PIZZA SAUCE. Good you were paying attention. The difference between tomato sauce and Pizza Sauce is that in Pizza Sauce they add some kind of cheese product and I prefer that you add the real deal and use grated cheese instead, you'll appreciate it the difference in flavor, trust me.

Stretch your dough, round, rectangular, or other, to 1/4" or thinner and spread olive oil evenly on top. You could drizzle the olive oil at the end if you prefer. Spread a thin coat of tomato sauce covering the dough to about 3/4 of an inch from the edge. Evenly add the herbs, Oregano, Basil, Thyme and seasonings, Garlic and Onion Powder, Salt and Pepper. 

Cheese is next. You can increase or decrease the amount of cheese you use depending on your preference for cheesy goodness. You can use shredded or sliced, your choice just cover most of the top with cheese. If you like your pizza saucy add the remaining sauce on top of the cheese.

Cook it at 450 degrees on either a pizza stone or top rack until the crust is lightly brown and the bottom is dark golden to light brown. Total cooking time will vary since you can't trust the temperature of ANY oven between 7 and about 12 minutes.

Enjoy and when it's done there's no box to throw away.

Greek Pizza

Greece is the birthplace of democracy, philosophy, feta cheese and kalamata olives but only two of these gifts to the world can go on top of a pizza! A few words about the primary ingredients before the recipe.

Kalamata Olives like all olives we eat have been cured, in the case of Kalamata they have cured for at least a week in brine and are then packed with brine and red wine vinegar. The red wine vinegar turns the olive a deep plum color and imparts a mildly tangy quality to the fruit. If the only olives you are familiar with are black and come in a can here is your chance to expand your horizons and I promise your taste buds will thank you.

Feta Cheese is a crumbly, salty white cheese that is usually made from sheeps milk and is used in a number of traditional Greek dishes like spanakopita and the diner staple Greek Salad. Feta is a made from the whole curd and is a little grainy on the tongue. One taste of this Greek staple will have you shouting Opa and breaking dishes!

Ingredients 
1 Ball of Pizza Dough
1 - 1 1/2 Cups Chopped Kalamata Olives
1 1/2 Cups Feta Cheese
3/4 Cup Part Skim Mozzarella
1/2 Cup Finely Sliced Red Onion
1/2 Cup Cooked Chopped Spinach
2 Large Tomatoes Diced (or 1 Can Diced Italian Style Tomatoes)
2 Tbs Dried Oregano
2 Tbs Dried Basil
1 Tbs Dried Thyme
1 Tsp Black Pepper
2 Tbs Extra Virgin Olive Oil

Preparation
If you are using fresh tomatoes mix an extra tablespoon of extra virgin olive oil and about 1 teaspoon of each basil, oregano and thyme with the tomatoes and set them aside.

Stretch your dough, round, rectangular, or other, to 1/4" or thinner and spread olive oil evenly on top. Evenly distribute the dried herbs on the oiled dough. I personally do not add any salt to this pizza because I get plenty from the Feta but I do add ground black pepper.

Cheese is next. You noticed I use both Mozzarella and Feta because I think the creaminess of the Mozzarella helps to balance the salt of the Feta and the Tanginess of the olives but if you like feel free to add more Feta in place of the Mozzarella. In either case evenly spread the cheese(s) over the dough leaving about 3/4 of an inch for crust along the outside edge.

Add the thinly sliced Red Onions. Note that indicated thinly sliced and not diced or in chunks because Red Onion is a powerful flavor and if the pieces are too big that is all you will taste and this is a pizza about the harmonious marriage of many flavors. Spinach is next. I don't always use Spinach and you won't be disappointed if you leave it out either by design or because you just forgot to buy it!

The last two ingredients to be added before putting your pie in the oven are the Olives and tomatoes. Be careful to avoid putting any of the Olive Brine or Tomato juice on your pizza as it will make it soggy. 

Cook it at 450 degrees on either a pizza stone or top rack until the crust is lightly brown and the bottom is dark golden to light brown.

Now if you promise not to tell anyone there is one thing you can add after the pizza comes out of the oven that will have be a real surprise and adds an entirely new dimension to the pizza. The Zest of 1/2 of a large lemon. 


Opa!


Pizza Dough

As far as I am concerned there is no really good excuse for using store bought pizza dough, except in an emergency like you are extremely hungry and the hour or so wait for your own dough to rise is just too long to consider.

Pizza dough is fast and easy to make and once you know how you can always have ingredients on hand to make a great dinner for one, two or ten without much fuss.

For all intents and purposes pizza dough has 3 mandatory ingredients; flour, water and yeast. Optionally, a pinch of salt, a pinch of sugar and a tablespoon of oil. That's it! All the ingredients keep for long periods of time so you can always have them on hand when you spirit moves you for a pizza or focaccia or a stuffed roll or calzone or a stromboli or you get the idea, they're all made from the same exact dough.

A few words about flour are in order before we begin. Flour is classified by how refined it is, unlike your author who is completely unrefined and for this discussion is either white or whole wheat. I refer to my preferred unbleached flour as white flour. The three main types of flour are cake flour which is very finely ground, bread flour which is made from a harder wheat and is high in gluten which made to dough it produces doughier and is used for bread and pasta. Last but not least is the flour everyone has in their pantry, All Purpose Flour which is really a blend of the other flours making it ALL PURPOSE.

I like my pizza like a like my women a little on the chewier side, tougher if you will so I use bread flour which is unbleached as well. A brief side note on bleaching, it is what the name implies like 1950's starlets bleached with some form of peroxide and sometimes other agents. I also like to occasionally mix in between a quarter and a third of whole wheat flour which adds a nutty dimension to the finished product.

Ingredients:
3 - 4 Cups of Flour
1/4 Oz Rapid Rise Yeast
1 Cup of Warm Water (110-115 degrees)

Preparation:
In a large mixing bowl add your dry yeast and optionally a pinch of salt and a pinch of sugar. The sugar kick starts the yeast by giving a quick snack and the salt keeps it from rising too fast. Add the 1 cup of water. Most household hot water heaters are set to about 120 degrees and your body temperature is about 98 degrees so mid way between full on hottest you can make your tap go and feeling just barely warm on your finger is the right temperature for the yeast to wake up and work.

Mix the yeast around with a fork or spoon or your finger if no one is watching and give it a minute to start to bloom. You may see bubbles start to rise up that is the yeast belching which is what makes the dough rise. Start adding your flour (the first 3 cups) and with a oil coated scraper or spoon get the mixing started. You could also oil your hands and just jump right in, your choice.

Once the initial three cups of flour are all incorporated you have to get your hands in the mix. Flour your counter or table and dump the dough ball out. Add about another half cup of flour and start kneading the dough by pushing down with the heel of your hand and then lifting and folding the dough onto itself and repeat. The more your knead the dough the sticker it will get as the glutens are released so keep adding a little flour at a time to stop it from sticking.

After you have kneaded the dough for about 3-4 minutes form it into a ball, dust it with flour all the way around and cover it with a bath towel. In about an hour it will have doubled in size and is either ready to use or punched down wrapped in plastic wrap and stored in the fridge or freezer for use later.

Lots of words but not lots of time. The active part of making pizza dough is less then 5 minutes which unless you live next door to a supermarket, bakery or pizzeria that sells raw dough is less time then it takes to go and buy it.


My New Favorite Vegetable

I confess, I get bored in the kitchen. I get complacent and fall back on routine. This is especially true when it comes to vegetables. I make it a point to have a large serving of vegetable every night and try to make enough to carry over for a healthy portion for lunch the next day. Sometimes I incorporate them into another dish but usually they stand alone, from Asparagus to Zucchini. I try to have something green with every dinner. So if there is a root vegetable involved  it is almost always supplemented by another offering.


Fresh Leeks
You would think a repertoire that regularly makes use of a couple of dozen or more produce choices prepared in a variety of ways wouldn't get old and yet sadly it does. I watch a lot of cooking shows and last year's popular ingredient was Ramps which are a kind of leek. If you know anything about me at all you should know that the last thing I am is a slave to fashion and pop culture. So needless to say Leeks in general were persona non grata in my kitchen.

Call me a knee jerk reactionary and a snob but if it's for the masses it's not for me. Fortunately the leek craze died down on the cooking shows and I began to notice them neatly bundled in groups of 2 or 3. Rubber banded together and looking alien, especially the dark green tops which appeared inedible. They looked like over sized Green Onions, which is really not far off the mark.


Leeks are members of the Allium family which is the group that includes onions and garlic. In fact Elephant Garlic is not garlic at all but a leek! Then a few weeks ago on what should have been my standard Sunday
ritual of a trip to Wegman's I was transformed.

True transformation is rarely planned or anticipated it usually happens unexpectedly by chance. This particular Sunday shopping trip was unusual, Lorraine, my beautiful partner in life, came with me. This is a rare occurrence, while she is brilliant and gifted in many ways when it comes to food she is a wonderful eater but an unwilling preparer and consumer. Food shopping for her is only slightly less uncomfortable than cooking which is torture.

So having her with my was a treat until we arrived in the parking lot and saw that this particular Sunday brought out huge crowds as though Saturday shopping was cancelled and they were all forced to swarm my Sunday shopping trip. Long story short this made the all the more uncomfortable for Lorraine and so in turn me. My discomfort was compounded by the horde of locust that descended on the produce and picked the place clean. The poor stockers were unable to keep up with the demand and the result was slim pickings beyond the basics, broccoli, cauliflower, spinach.

Stuck between the celery and green onions on one side and the fresh herbs on the other were the leeks. Staring defiantly at me, daring me to pick them up. I'm not a person to be pushed around by produce I stared right back for a good long time, I even faked reaching for a bunch and backed off trying to get them to blink so I could walk away victorious. They never blinked. Defeated I picked up a bunch, plopped them in my basket and moved on to fruit not making eye contact with any of the zucchini for fear they would see my shame.

This is not a sad story about betrayal or disappointment, this is a story about discovery and the excitement of a breathless new infatuation that is already blossoming into a deep and abiding love.

Sauteed Leeks
Chicken & Rice Soup

Sauteed Leeks

Sublimely elegant, supremely simple and surprisingly simple sauteed leeks can easily become a favorite because they are both mildly familiar in flavor and at the same time unique. Leeks have a very mild onion-y and vaguely garlic-y flavor to them but only enough so that if you pay attention you recognize the taste but not so strong that you eating onions.

Buying leeks is easy, they are usually rubber banded together into groups of 2 or 3 depending on your market. I find 3 nice size leeks to be perfect for 2-3 servings so you can up-size based on your needs. Fresh leeks have a dark green leaf on top which fades to white on the bottom. When selecting leeks the bottom (the white part) should be firm and solid if there is any real give pass them by because they are really old.

Ingredients:
2 Tbs Olive Oil
1 Tbs Unsalted Butter
1/3 Cup White Wine
3 Large Leeks

Preparation:
Like all leafy vegetables leeks tend to pick-up bits of grit and sand as they sprout from the soil and need to be cleaned thoroughly. Start by trimming away the inedible tops and the root bottom. I save the tops in the freezer for making stock but that's another story. Splint the leeks length wise and then slice the halves about 1/4 inch wide. Place the cut leeks in a colander an rinse thoroughly with cold water and drain.

In your favorite straight sided sautee pan add the olive oil and butter and heat the pan on high heat until the butter is completely melted and stopped bubbling. The bubbling is the water in the butter boiling off. When the pan is ready add your leeks.

Stirring occasionally let the leeks cook until they start to get a little brown on the edges and are tender all the way through, about 5-7 minutes depending on the quantity. Without lowering the heat add your wine. Stir your leeks in the wine to make sure they are all treated to nice drink. Cook until almost all of the wine is gone.

Saturday Date Night


As many of you know my wife, Lorraine is a CPA and we have our own business which means during tax season even though we are together all day and into the evening together in the office we don't spend a lot of quality time with each other. So years ago during tax season we came up with Saturday Date Night where we would sit in front of the TV with a good movie and enjoy an easily prepared meal.

The idea of date night dinner was that it had to be simple, so I wasn't spending more time in the kitchen then necessary so the usual fare become creative salads; Asian with Mandarin orange toasted almonds rice wine Teriyaki vinaigrette, or Blue Cheese crumbles on spring mix with Raspberry Balsamic Vinaigrette or something with goat cheese because everything is better with goat cheese.

Now that Matthew is out of the house and we're alone, except for the dogs and cats we still enjoy our date nights and when it's not tax season I sometimes indulge myself and make something other than salad which brings me to this week. I went a little beyond my normal 15-20 minute date night prep limit and spent about an hour preparing and cooking three incredible items.

Whether you like tomatoes or tomato salad or not I promise you can not judge until you savor the sublime flavor of the never bright red usually hideously unattractive heirloom tomato! 

Heirlooms are old school tomatoes, the ancestor, the mother of long shelf life bright red mild mannered hybred tomato. Heirlooms, when you can find them are usually organic and well worth the few extra cents they cost. Think of them as tomatoes on steroids. Big fleshy flavor packed fruits of the vine.

Eggplant Caponata is a rustic Italian\Spanish eggplant salad which can be purchased in a can in ethnic food aisle of most supermarkets and is relatively expensive in a cost per ounce basis.Caponata's main ingredients are; eggplant, onion, tomato and olives. This deep red almost brown salad is lumpy and viscous and like heirloom tomatoes and myself not particularly attractive to the eye but we more then make up for looks in taste.

Our date night meal was rounded out fresh focaccia. Focaccia is an Italian flat bread. As you'll see from many of the recipes I'll post here my food is decidedly ethnic, not just Italian, but Spanish, Mexican, French, German, Polish, African, Asian, Jewish... The more ethnic the better. Why? This will be answered in greater detail one day in a post of it's own, however for now the short answer is because American's eat junk and if you are looking for a healthy tasty meal, THINK ETHNIC!

 Now for the recipes.
Basic Focaccia
Caponata
Heirloom Tomato Salad


Heirloom Tomato Salad

I love a beautiful tomato, I'm even fond of the kind that grow on vines. When my I want a squeeze from my tomato I make her some fresh heirloom tomato salad. My tomata's got gams up to here, she's one sweet dish. 

Sorry I got carried away with Sam Spade-isms and confused my lovely wife Lorraine with the vegetable that's really a fruit, biologically speaking the tomato is a fruit. All that said, just like women there are all sorts of tomatoes. In fact there's a perfect tomato for every man and for every occasion. But when it comes to tomato salad for me the king is the Heirloom, of which there are numerous varieties but we'll stick to the generic term Heirloom to avoid too much confusion.

No matter the particular Heirloom in question it probably immediately be the apple of your eye. Unlike hybred tomatoes heirlooms are almost never all red, they do have red in them but they are never the perfectly pristine pictures of rosy purity. Who am I kidding these ladies are not at all attractive on the surface, in fact they can be downright ugly but once you get them behind closed doors and get passed their appearance brother your taste buds are in for the ride of their life!

Tomato salad is the wonderfully simple dish that can work by itself or as an accompaniment to something else. I was introduced to the latter at John's deli in Brooklyn where I heard someone order a chicken cutlet hero (sub, grinder, hoagie) with tamata salad. In Brooklyn there are not tomatoes only tamatas. At first I turned my nose up at the thought of it but when I tried it I was hooked.

Ingredients
Tomatoes
Onion (I like red but you can use whatever you prefer)
Fresh Basil (or dry)
Dried Oregano
Dried or Fresh Thyme
Vinegar (I use Balsamic because I'm sophisticated but Red Wine or some other is good too)

Preparation
Slice your tomatoes into wedges about 1/2" thick
Slice your onion thinnly
Chop up your basil
Combine everything in large bowl and let it stand for a least an hour, refrigerate it if it is going to be more then a couple of hours before you plan to eat it. Yes you could eat it immediately but the wait is worth it since it give everything a chance to marry.

Notes
In mid to late summer when heirlooms are available that is all I use but a nice extra ripe, starting to get a little soft beefsteak or other works too especially in the middle of the winter when a nice tomato salad will remind you of the warm days of August.

Eggplant Caponata

Caponata or Eggplant Caponata may have originated in Spain and migrated to Italy before making it's way to America primarily via Italian immigrants. Caponata is a sweet and sour dish or as they say in Italian agro dolce. I am a big fan of agro dolce dishes because the argument between the two contrasting flavors as they dance around your palate is one of the most thrilling things your tongue can do while remaining inside your mouth.

Caponata is one of those wonderfully rustic dishes that is born of simple inexpensive ingredients whose ordinary notes combine to create a symphony of taste. This may seem to be hyperbole but it is not. Caponata, can be served as an appetizer, snack or as part of a meal made of tappas (small dishes). It only gets better with time which is great because you can make it and eat it today, tomorrow and the next day and have three different experiences with the same batch.

If your only experience with caponata is the kind that comes in a can and a relatively expensive can at that treat yourself and perhaps someone special to a treat and make some from scratch. How expensive is relatively expensive? Well this recipe will cost you less then $7. (probably much less) and makes about 2 pounds of finished product. If you buy 2 pounds worth in the cans it will cost you about $15.

My caponata is well mine, I based it on a few recipes and find my version suits my palate perfectly. I have seen the recipe include cocoa or chocolate and perhaps one day
With all my recipes I don't mind if you change them, improve them or take credit for them as you own. Just enjoy them


Eggplant Caponata 

Ingredients
1 - 1.5 – 2 lb eggplant - Cut into ½” Cubes
1 Large Yellow or Spanish Onion -  ½” Dice
2 Celery Ribs – Split in half & ¼” Chop
1/3 lb Oil Cured Olives (Sicilian or Kalamata or both) Rough Cut
2 Tbs Capers Rinsed
1  Can Diced Tomatoes (Italian Type)
Alt 1 Very large Beefsteak or 3-4 Roma\Plum tomatoes ½”  dice tossed with dry basil, oregano and thyme.
1/3 Cup Pignoli (Pine) Nuts
2 Cloves of Garlic Minced
1 Tbs Tomato Paste
¼ Cup Balsamic Vinegar
2 Tbs Sugar
½ cup of water
2 Tbs Olive Oil
1 tsp salt
1 tsp black pepper

Preparation
In a heavy skillet heat your olive oil to just below smoke point and onions between 5-8 minutes. Sautee onions until they are soft\translucent and brown around the edges.
Add eggplant, celery and garlic, continue cooking until eggplant is browned and soft about 10 minutes.
If you are using fresh tomatoes add them at the same time as the eggplant, if you are using canned tomatoes add them (undrained) about 5 minutes after you add the eggplant.
When Eggplant is cooked add sugar, salt and pepper along with about ½ cup of water.
Add chopped olives and about 2 tbs of the brine if you have it.
When water is almost all gone add balsamic Vinegar and pignoli (pine) nuts.
Add the capers
Cook out all visible remaining liquid (a couple of minutes at most)
Serve warm on crostini or focaccia or refrigerate and reheat to room temperature when needed.

Notes
When it comes to the type of eggplant you use, you choose. I like making this using Sicilian eggplants with Sicilian and Kalamata olives. I don't peel my eggplants before I cut them up because (I could be wrong) I think the skin brings a little extra flavor, color and texture to the caponata.  Sometimes I toast my nuts, sometimes I don't, depends on my mood but mostly whether I remember or not. I understand if you use canned tomatoes, I avoid them because of the added salt, I like to control exactly what goes in my food rather then someone else.

Focaccia - Italian Flat Bread

Focaccia - Italian Flat Bread. 
Peasant, Rustic, Country, Simple. No matter what you call it or how you slice it, delicious. The beautiful thing about focaccia is that you can put whatever you want on top just so long as it does not include sauce which then makes it a pizza, usually. Traditionally they are topped with herbs, like this one, or a little cheese, olives maybe some onions and peppers or olives. But herbs and olive oil are the mainstays.

At the hear of any Focaccia is the dough, home made is best, because it takes less then 10 minutes to make and it is practically free. My thought is I like to eat and I like to eat a lot, so the more I can make for less the better.

Ingredients:
Pizza Dough
2 Tbs Extra Virgin Olive Oil
2 Tbs Dried Basil
2Tbs Dried Oregano
1 1/2 Tbs Dried Thyme.
Salt and Pepper

Start with a ball of pizza dough your own or already made from the supermarket or bakery but NEVER that pre-cooked stuff in plastic. If you're buying pre-made dough the ingredient list should be short and simple, Flour, Yeast, Water, Salt. 

Stretch your dough out on either a rectangular cookie sheet or a round pizza pan until it is no more than 1/8" thick. Work it out with your fingers to a mostly uniform thickness all the way to the edges this is a bread not a pizza so we don't want a thick crust on the outside edges. 

Add about 2 table spoons of Extra Virgin Olive Oil and spread that around the top of the dough. Yes, Extra Virgin makes a difference here because it is part of the flavor of the focaccia. I use dried herbs here but you can substitute fresh if you want. Start with Basil 2 - 3 tablespoons spread evenly. The same for Oregano and about half as much Thyme. Finish off with a large pinch of either preferably kosher salt or if you want a lower sodium option coarse ground sea salt and a nice pinch of black pepper both evenly distributed.

Cook it in a 450 degree oven until the bottom is golden brown that I like to finish it under the broiler to get some color on top. This is optional but it's my blog and my preference. Once it's done let it cool and cut it into individual portions about 2 inches square but please don't obsess about shape or size this is about eating not displaying it in a museum.

How Cliche is That!

I Eat Therefore I Cook!


My inaugural post and I am at a loss for words. Let's pretend for a moment that this blog is far more then it actually is, a place for me to talk to myself about food. I will pretend for the purpose of this momentous post that it is something far more noble and at the same time humble, it is for my children. A message board about about how I cook and eat and why I have such a hard time going to a restaurant unless it's just exceptional.

For me food matters. Not just as a sustenance for the body but nourishment for the soul. Food as allegory for life. Or if you prefer, for no other reason but pure pretense life as allegory for food. No matter, I take food seriously but with a grain of salt. I temper my culinary musing with a pinch of passion and a pound of fun. For me cooking is not just about eating it is about creativity. It is sharing an idea with those you love in the most intimate of ways.

The Joy of Cooking is about pure adulation and the joy of cooking is about the trust your dinners place when they bring fork to mouth and step into the unknown at your request. The exhilaration, the sublime, the divine the use of all our senses at once the shared experience. The glow of triumph and the bitter taste of failure. Few things bring us together like food.

I hope I've peppered this opening post with enough well thought out literary seasoning to make it worthy of the title.